What's new in version 1.6?
So many new managed agents, and now completely free.
Get AI Thing
Download AI Thing
Download AI Thing
Install AI Thing
Install AI Thing
- Go to your Downloads folder and double-click the
AI Thing.dmgfile - Drag AI Thing into the Applications folder
- Open the Applications folder and double-click the AI Thing app
- Show/hide AI Thing using
Control (^) + Space
Provide Permissions
Provide Permissions
-
Open the AI Agent with
Control (^) + Space -
Type:
What is @this? -
A popup will appear asking for permission to allow AI Thing to record the screen and audio:
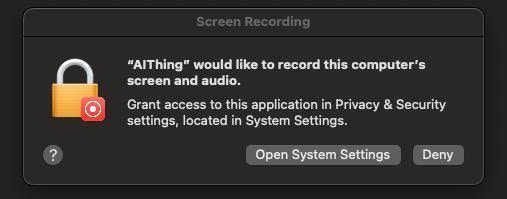 You may choose not to grant permission. Without it, AI Thing will still work but won’t be able to understand @this.AI Thing does not record audio at all. It does not continuously record your screen. It only captures the screen when @this is mentioned and displays it to the user. Privacy is a top priority for AI Thing.
 -
If you grant permission, you’ll be prompted to quit and reopen the app:

-
Open Settings with
Control (^) + S - Click the Quit button in the bottom-left corner.
- Restart AI Thing by opening it from the Applications folder.
Setup Agents Optional
Choose Model
Choose Model
- Open Settings with
Control (^) + S - Get your Anthropic API key (Create Key)
- Paste the key (starting with
sk-ant-...) into the field shown below:
Make sure you have credits in Anthropic.
Set Up Remote GitHub Agent
Set Up Remote GitHub Agent
You can also use GitHub as a managed agent.
- Go to the Agents tab in Settings
- Click
+ Add Agent - Enter the following details (What are these?):
- Name:
GitHub - URL:
https://api.githubcopilot.com/mcp/ - Auth Token:
ghp_xyz...(Create Token)
- Name:
- Close Settings with
Control (^) + S
Set Up Remote Apple Agent
Set Up Remote Apple Agent
This step explains how to use a local AI agent. You can skip this step, as it can be more complex.
- Go to the Agents tab in Settings
- Click
+ Add Agent - Select the
Localradio button - Enter the following details:
- Name:
Apple - Command:
<path/to/bunx>e.g.,/Users/username/.bun/bin/bunx
You may need to install bunx usingbrew install oven-sh/bun/bun. Runwhich bunxin the terminal to find the path to bunx. - Arguments:
@dhravya/apple-mcp@latest
- Name:
- Close Settings with
Control (^) + S
Use Agents Optional
Summarize GitHub Issue
Summarize GitHub Issue
Let’s summarize an issue.
- Open the AI Agent with
Control (^) + Space - Type:
Summarize https://github.com/github/github-mcp-server/issues/2
If it doesn’t work, make sure the “GitHub” agent is enabled in Settings.
Create Reminder
Create Reminder
Let’s create a reminder.
- Open the AI Agent with
Control (^) + Space - Type:
Create reminder to pay credit card bill tomorrow
If it doesn’t work, make sure the “Apple” agent is enabled in Settings.
Next Steps
Now that you’ve run your first task, explore these key features:Respond Anywhere
Respond Anywhere
AI completion everywhere, not just in IDEs.
- Open the AI Agent with
Control (^) + Space. - Place your cursor in any window where you want to type.
- Type:
Add a joke @here
→ The AI will insert a joke at your cursor. - Select the inserted joke.
- Type:
Replace @selected joke with another joke
→ The AI will replace the selected joke with a new one.
Multiple Tabs
Work on many tasks at the same time without losing progress.
Managed Models
Choose which AI you want to power your tasks.
Multiple Agents
Add and control helpful AI assistants for different jobs.
Keyboard Shortcuts
Use simple key combos to get things done faster.
Need help? Email us at help@aithing.dev.